I had retired my Intel E6600 2.4 GHz Core 2 Duo and eVGA 122-CK-F68 Nvidia 680i motherboard combo last year when I upgraded to an Intel i5-750 and P55 platform. At the time I didn’t need it for anything so it languished in my office closet.
Recently I’ve been ripping my DVD collection and playing them back on my PS3 on one television and a Mac Mini with XBMC on another. My existing WHS consists of four 500 GB hard drives in a dual Xeon 2.8 GHz server with 2 GB of memory. It’s on the older side but works well, the hard drives working off a Promise SATA controller and a 300-watt power supply. Unfortunately, the 2 TB of storage was full so I’d have to add more storage or revamp what I had. This all happened over the holidays and I was able to pick up two Western Digital Caviar Green 2 TB 20EARS SATA hard drives for $80 each. That would give me enough space to hold my movie collection but was it worth adding these drives to the old setup.
Going through the spare parts around the house I came up with a decent new Windows Home Server:
- eVGA Nvidia 122-CK-F68-AR 680i motherboard: leftover from previous system
- Intel E6600 2.4 GHz Core 2 Duo CPU: leftover from previous system
- Stock Intel cooler: sitting around from when I bought the E6600
- 4x 1 GB DDR2 800 MHz RAM: extras from some RAM upgrades
- ATI Radeon 9250 PCI video card: leftover from someone’s PC failure
- Antec Three Hundred chassis: leftover from someone’s PC upgrade
- Corsair CX400 400w power supply: extra someone gave me
- Samsung IDE DVD burner: old unit from an upgrade
- 4x Antec 120mm fans: leftovers from a big sale a few years ago
- Internal SATA to eSATA adapter cable: eBay $1 purchase a while back
- Windows Home Server OEM: Technet leftover
As you can see I like to keep parts around just in case. For this build I was well served: everything was leftover from somewhere that didn’t cost me anything except for the case fans which were $2 each and the new hard drives. Detractors will say it’s too big and draws too much power but it’s free and I keep my servers in my basement furnace room where noise isn’t an issue and it stays under 70 degrees year-round.
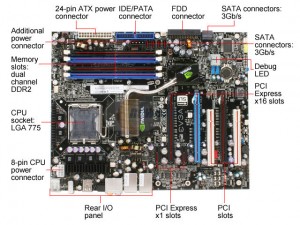
This motherboard was perfect for a WHS build as it was chock full of features. At the time this was the most expensive motherboard I had ever purchased and its cutting edge-ness continues to pay years later. First off it has six SATA II 300 headers plus one PATA header: that’s a lot of storage connectivity. Next up are five three-pin fan headers with manual speed control through the BIOS. Dual gigabit ethernet, six rear USB 2.0, 1394a firewire round out the features.
The build was straightforward but I had some options along the way. Once put together I had two front intake 120mm fans, one rear exhaust 120mm fan and one roof exhaust 140mm fan. The three 120mm fans were set to 50% speed in the BIOS and the roof fan was included with the case and had a manual switch I set to low. The stock Intel cooler was the loudest fan in the system and it had an overall buzz but not too bad. As well I covered the side panel fan mount to keep airflow moving front to back.
I enabled Intel Speedstep for the CPU: it can give the performance power needed and keep things lowered most of the time. The PCI video card was a 3.3v model that worked great on this board: it was a fanless model with D-SUB and DVI connectors. For a home server, any video would do as I wasn’t doing any direct video or music ripping on this system.
For storage, I connected the PATA DVD drive up and put the two 2 TB drives in the 3.5″ drive rack with a space between. I added the SATA to eSATA adapter, plugged it into the sixth SATA header and connected it to the rear: setting that port in the BIOS to eSATA would allow multiple connections. I now had eSATA, USB 2 and 1394a external connections for any storage I wanted to add: if needed I could add a PCI-E USB 3 card in the future but for now I was well covered.
Once the hardware build was done I installed Windows Home Server with no CD Key: I had 30 days to activate and I’d learned the hard way before that systems may need to be blown away and installed several times. Since WHS is based on Windows Server 2003 all the drivers I used were for Windows XP including chipset, network, audio and video. EVGA only lists the chipset drivers on their site so if you’ve lost the installation CD you can get the motherboard drivers at Nvidia’s site and HD audio drivers from Realtek. All installed without a hitch and I ran all the required updates.
At that point, I installed SyncToy and mapped network drives to my existing WHS. I noticed things were running a bit sluggish: there was a pause before any action started and overall the system seemed slow. Since I had used this motherboard, CPU and RAM combo for several years on Windows XP, Vista and Windows 7 I knew there wasn’t a hardware issue so I guessed it was the PCI video: perhaps it was killing the PCI bus. I swapped the Radeon 9250 out for a PCI-E x16 Geforce 7600GT from the parts closet but it didn’t help.
Not sure where to go I poked around through device manager. In the ATA controllers section, I saw there is a speed test button: one of many thoughtful Nvidia features. I checked both WD Green drives: one was operating at 146 MB/s and the other at 14 MB/s. Running the test several times made no difference. I checked the Western Digital site and they mentioned setting jumper 7-8 for XP systems with Advanced Format drives: while this isn’t an XP system all the drivers were and it was worth a shot. I removed both drives, added a jumper to pins 7-8 and reinstalled WHS. The system was fast and the speed test showed 146 MB/s for both drives.
Dual Gigabit NICs was a feature I hadn’t taken advantage of in this motherboard’s previous lives but now it would be put to good use. In Network Access Manager, part of the Nvidia Control Panel lies the option to team the two ports for combined speed, failover or a combination of the two. I selected teaming with failover so the ports would operate as a combined 2 Gb with the system keeping things alive if one port failed. Teaming really only works well if the switch you’re connecting to supports the feature and that means a commercial switch: I’m using a 24 port Trendnet TEG-240WS as my house is fully CAT5e wired. As well don’t install nTune if you want to use the networking features in Windows 2003: that was another cat and mouse chase I had to discover the hard way. You really don’t need nTune since you’re probably not going to overclock your WHS.
Update: once you selecting teaming reboot the PC and a new network connection will appear. I teamed the two NICs and then didn’t have any connectivity and couldn’t adjust any settings; after a reboot, I was able to set my static IP.
Running SyncToy in echo mode between the existing server and the new one overnight I had all the files copied over. I renamed the old server, set its IP to dynamic, renamed the new server to the old one’s name and set its IP address to static. On each PC I went to “c:\program files\windows home server” and ran discovery.exe which added all the PCs to the WHS backup schedule.
I now had the new Windows Home Server in place, up and running. TVersity was installed and is transcoding and streaming 1080P video to my PS3 without a hiccup; I prefer MKV and that won’t play natively on the PS3. I’ll monitor everything to verify the new WHS is working just right before activating with Microsoft. I was going to install WHS 2.0 “Vail” but it’s still beta software and I’m comfortable with the current version.


