Blast from the past: originally published September 27th 2004.
Antec has been a favorite case manufacturer here at eBabble for some time, and with good reason. They consistently produce quality cases filled with features. With the surge in popularity of the small form factor (SFF) PC cases from the likes of Shuttle and Iwill, Antec saw an opportunity to produce a case that could accept the micro ATX form factor, thus allowing anyone to build their own SFF PC without the need to but the case and motherboard from the same manufacturer. The Aria is manufactured of aluminum and plastic, making for a light unit that’s easily transportable.
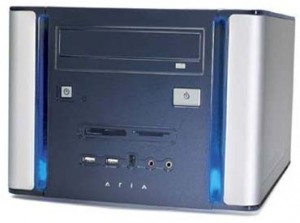
Lets examine the case from the outside in. Looking at the front of the unit, the case has one external 5.25” drive bay and no 3.5” drive bays. This is made up for by the inclusion of an 8 in 1 media card reader, two USB 2.0, one IEEE1394a FireWire connector and headphone and line out jacks. A small reset button and a large power button complete the front bezel. Two blue strips on either side light up when the system is on. The 5.25” drive bay has a built-in cover, so it doesn’t matter what colour your optical drive is.
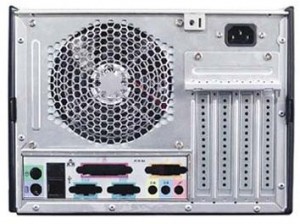
Moving to the rear we see a standard micro ATX layout, with the port cutout and four expansion slot covers. The slot covers were a little difficult to remove, as the top crossbar has two screws to be removed, then each slot has a small screw. The power supply fan takes the most space as it’s a 120mm variable speed fan. A standard power connector but no on/off switch. Fairly simple layout. From here you can see how the cover is removed. First the top slides off towards the rear once the large thumbscrew is removed. Then the sides can be removed by pressing the tabs and pulling each side off. As I handled the side panels I managed to scratch both sides, so be careful where you bang them.
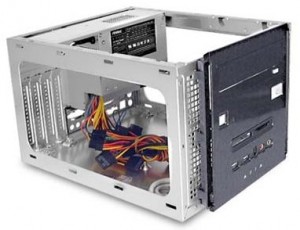
Examining the interior shows the space available to work. The drive case sits on the top and swings out towards the front. It can accommodate one 5.25” drive, one 3.5” drive below it and two 3.5” at a 90 degree angle on either side of the centered drive. This unit is removed in the picture above. The front connections each have their own cable, so that’s three USB cables in a single row five pin block, FireWire connector and front audio connectors, plus the power connector for the lights. The media reader isn’t covered in the unit, so you can see the inner workings and must be careful not to ding anything.
The power supply is a unique design, to take advantage of the space available. It’s a 300 watt unit with a single 12mm fan that handles all air flow for the chassis. Enough power connections to handle anything you could fill the Aria with.
Let’s get to the nitty-gritty of building a system around the chassis. The sides and top come off easily and give quick access. Removed the drive cage and laid it aside for later use. There are a fair amount of cables in the unit when you include power and front connections, but they move aside easily. The motherboard has two screw mounts and the rest are standoffs with 90 degree hooks; to mount the motherboard you slide it in towards the rear of the case, hooking the board with the standoffs and then screwing it down in two spots. Very simple to use, but I had some wriggling to get the high-end back of the motherboard under the power supply, as it just clears. There is enough space to add the CPU, heatsink and RAM after the motherboard is installed.
Running the cables from the front along the side to the motherboard connections for USB, FireWire, and the rest. I squeezed them between the motherboard and edge of the case to keep everything neat and tidy. Inserting a video card and sound card required removing two screws to take off the rear guard, then removing small screws that hold the slot covers in. Stripped one screw with minimal force, but only one of four. Connected power to the motherboard and moved the cable out of the airflow path. The optical drive mounted with standard screws, but six longer screws with rubber grommets are provided for the hard drive. Nice touch to reduce vibration, but could have used the same for the optical drive. It’s a bit of a stretch to get power connections onto the drives and then close the swinging drive cage, but Antec provides a rounded PATA cable for the optical drive and a SATA hard drive was used. Everything back together and powered up revealed blue lights on the front of the unit and a fairly quite operation. I may be spoiled by Antec’s other products, but the Aria sounded the same as the Sonata or SLK3700BQE.
If you’re looking for a small form factor case and want to build a system around a Micro ATX motherboard, your choices are limited. The Antec Aria is a solid choice for this criteria and deserves to be considered.


